Quick Links:
The Hotspot activity is a variation on the Procedure activity type: each deck contains cards describing a sequence of steps in a process. The primary use of Hotspot is to simulate software system tasks, especially touch-based ones. From the trainee’s perspective, the Learn views look almost identical to those of Procedure. The real difference comes in the Practice and Challenge Modes. With Hotspot, the learner will actually click or touch an area of the image itself instead of making a text-based multiple-choice selection.
The Hotspot Activity can be used to rapidly create simulations of common tasks for almost any system type: POS (point-of-sales) systems, reservation management apps, even control panels for non-software equipment (microwaves, deep-fryers, etc.). In short, any task that can be represented as a sequence of locate-and-touch actions can be simulated with Hotspot.
Learn Mode: Designing a Hotspot Activity
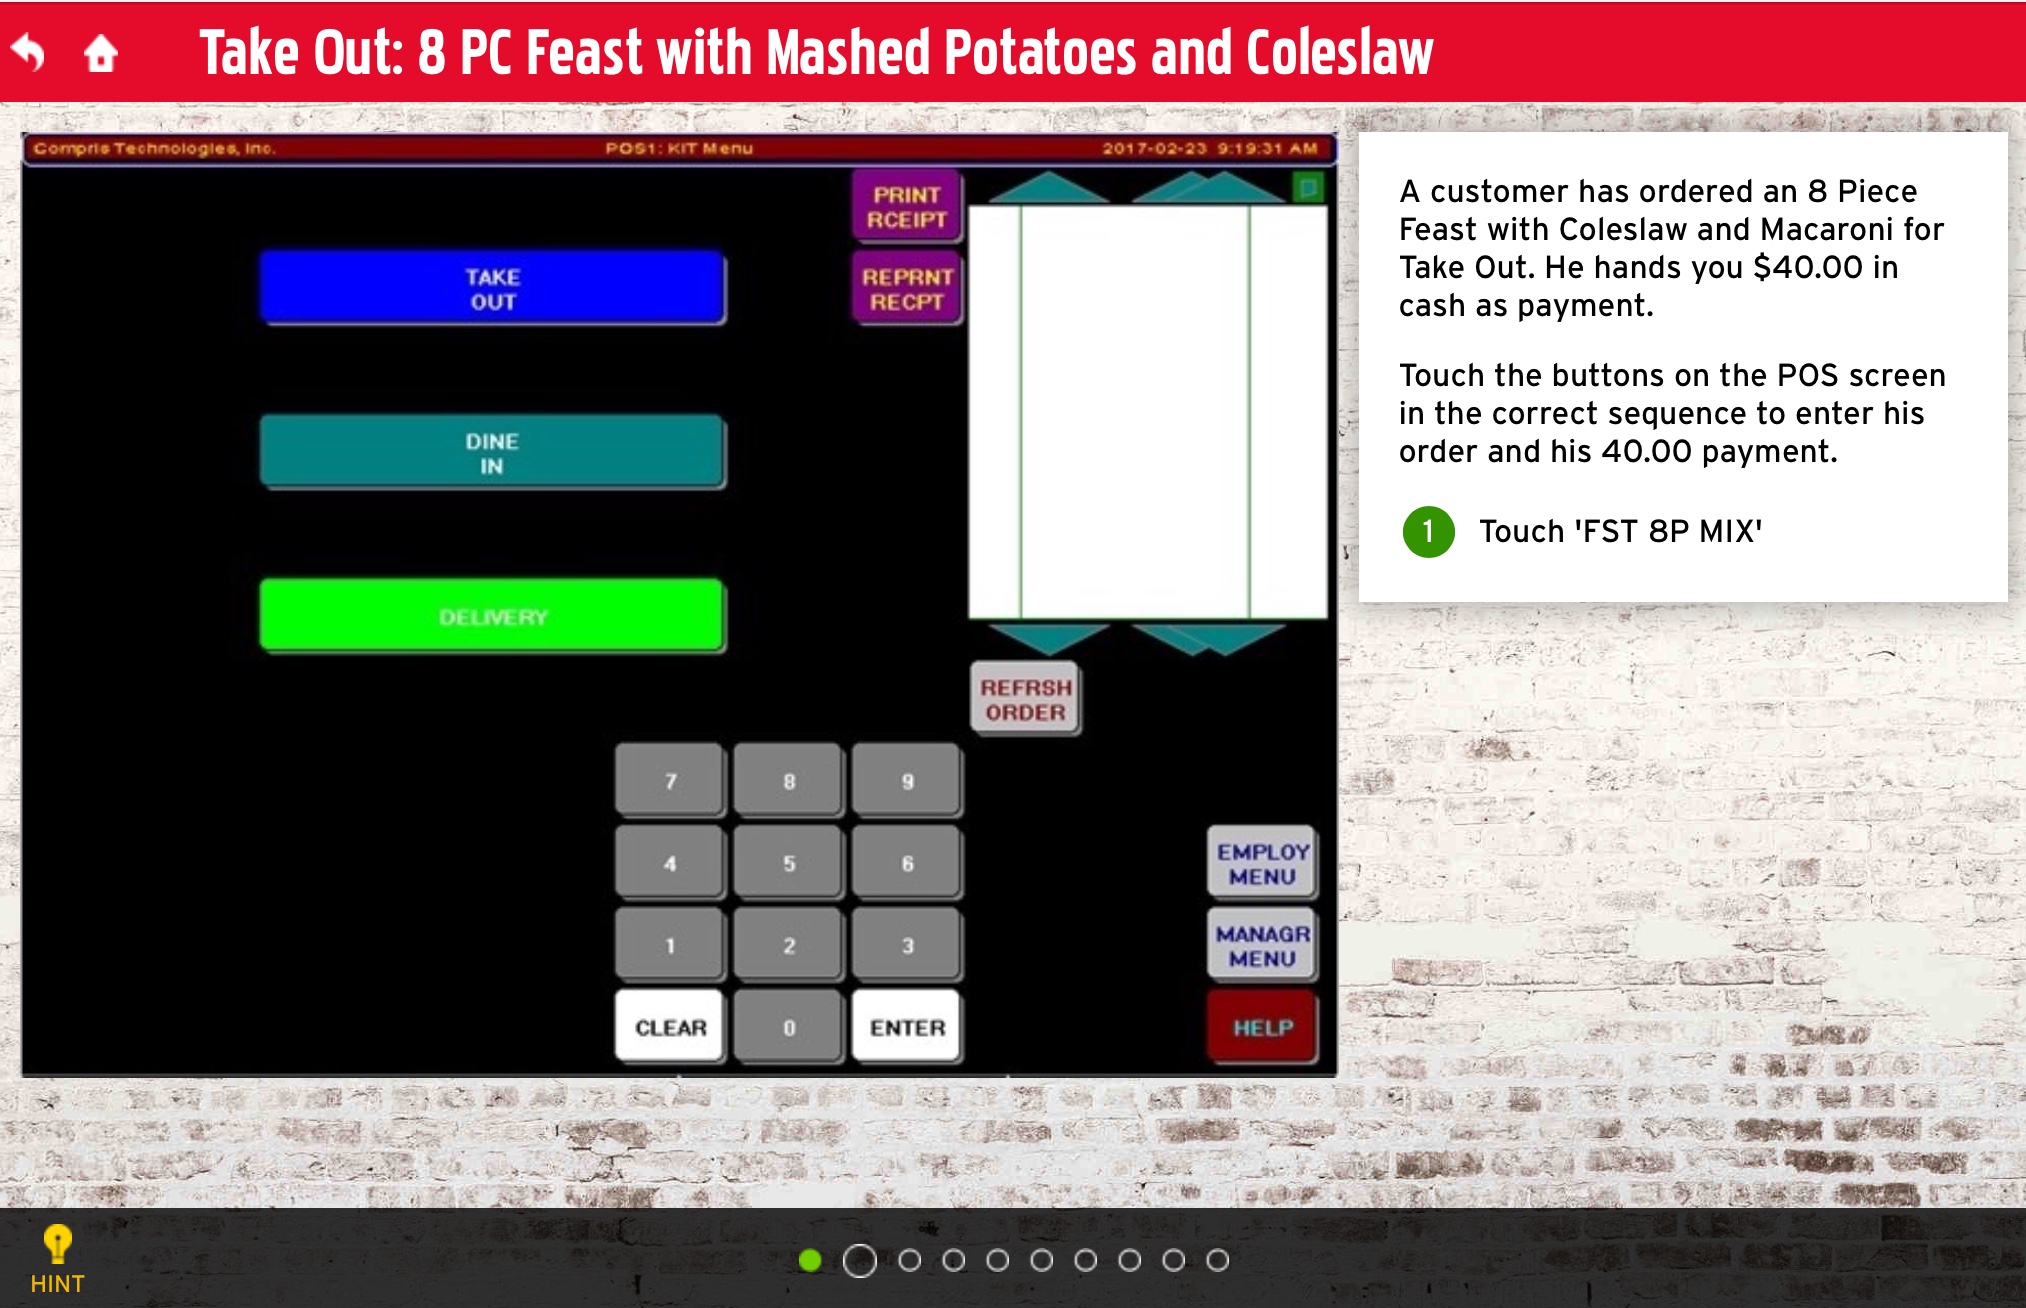
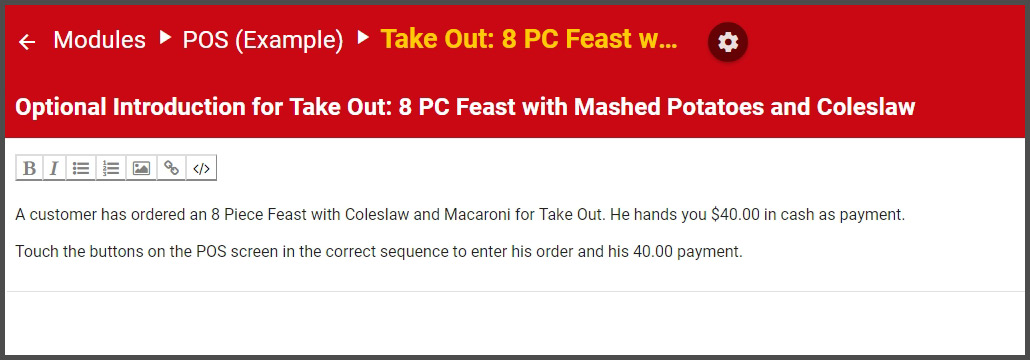
As with a regular Procedure, each deck in a Hotspot module should correspond to a specific system task, and each card should represent a step in that task. The example below is taken from a very basic, but very common, POS scenario: taking an order.
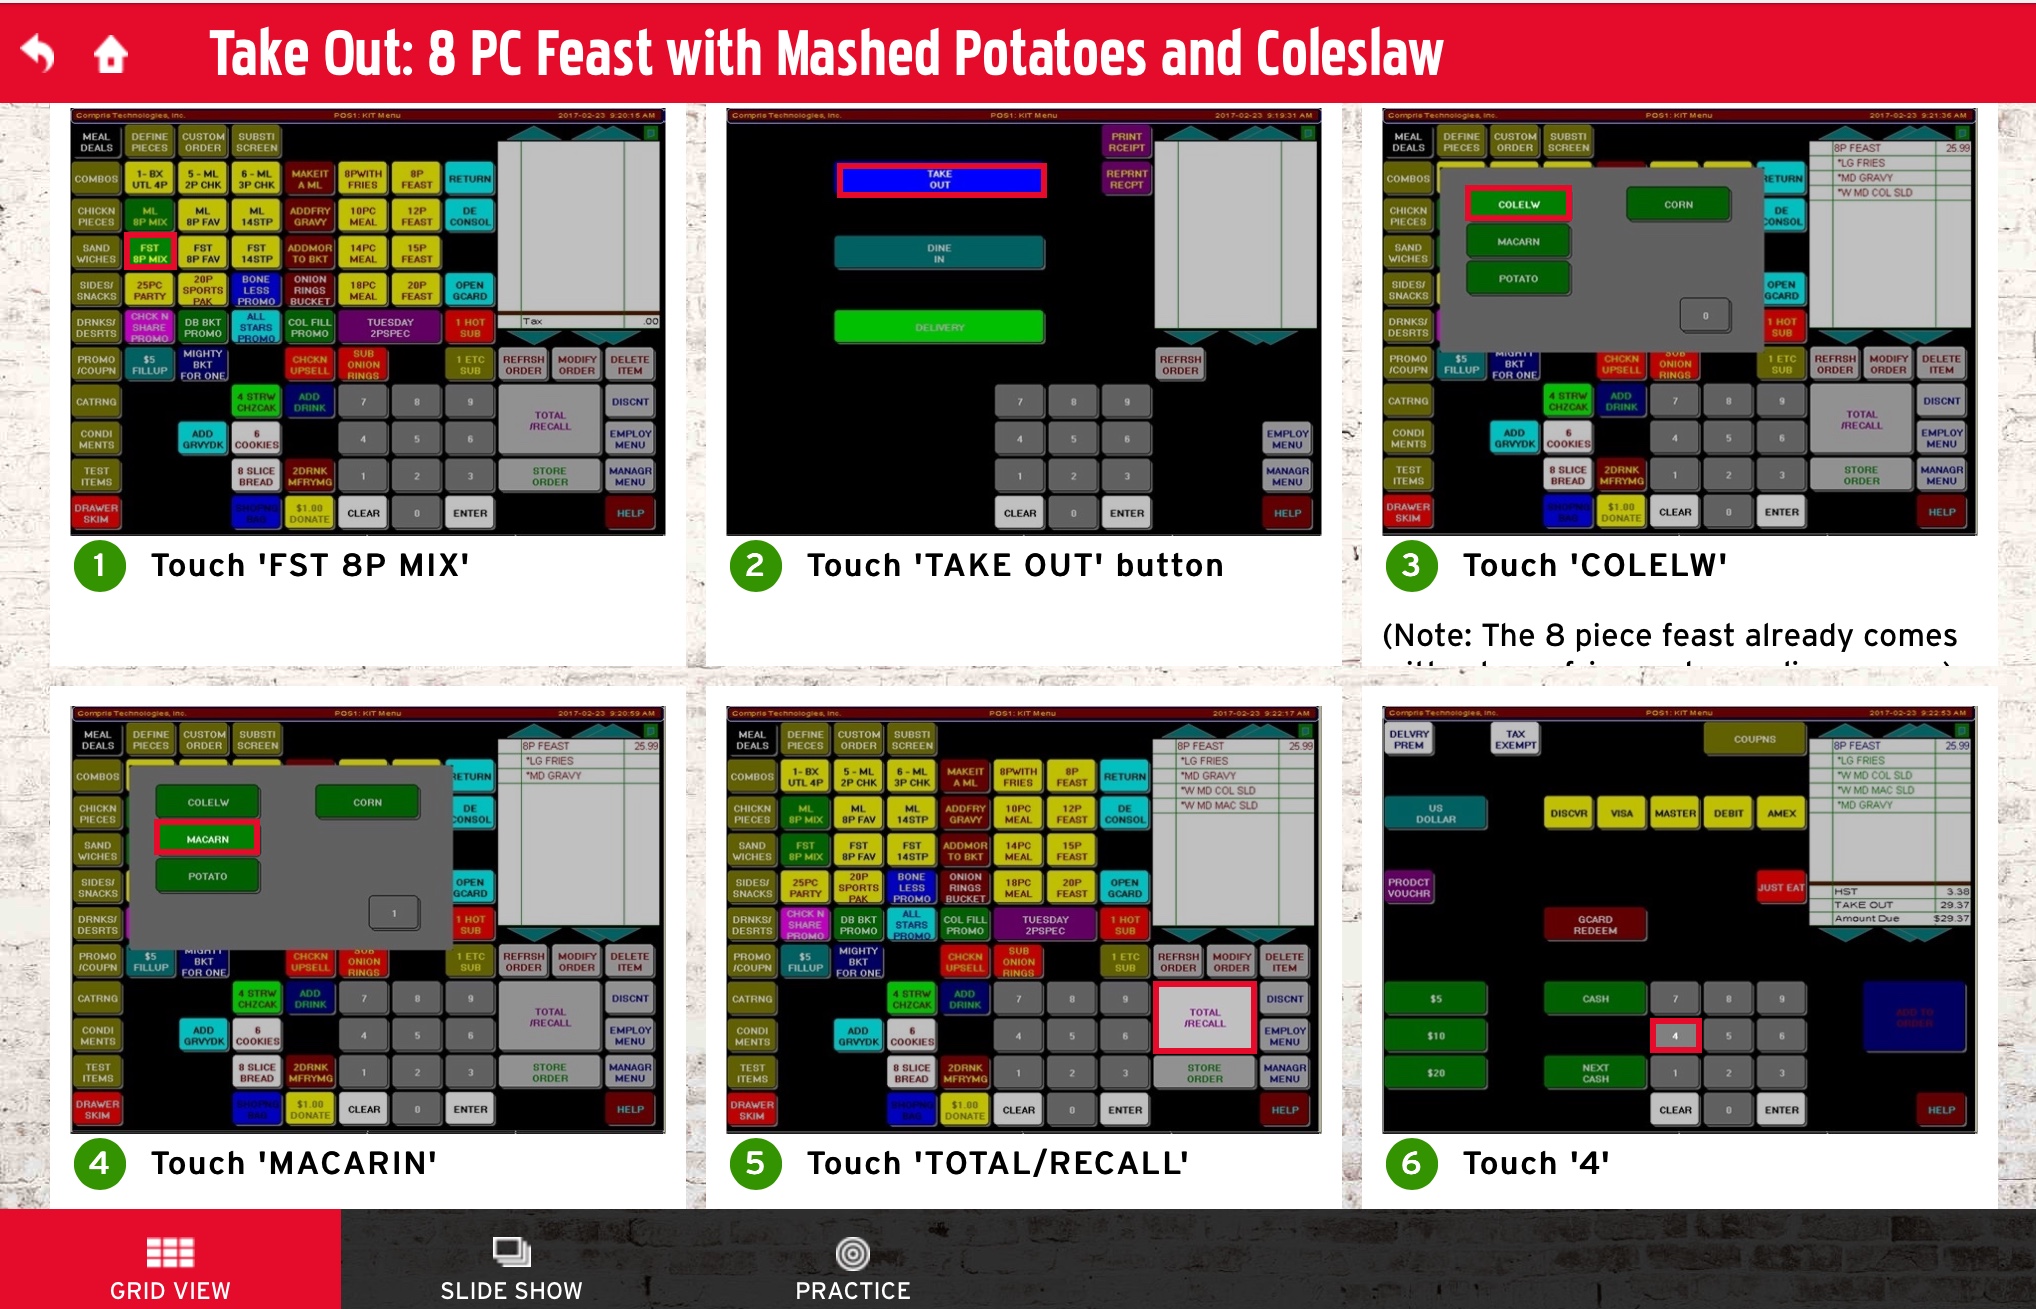
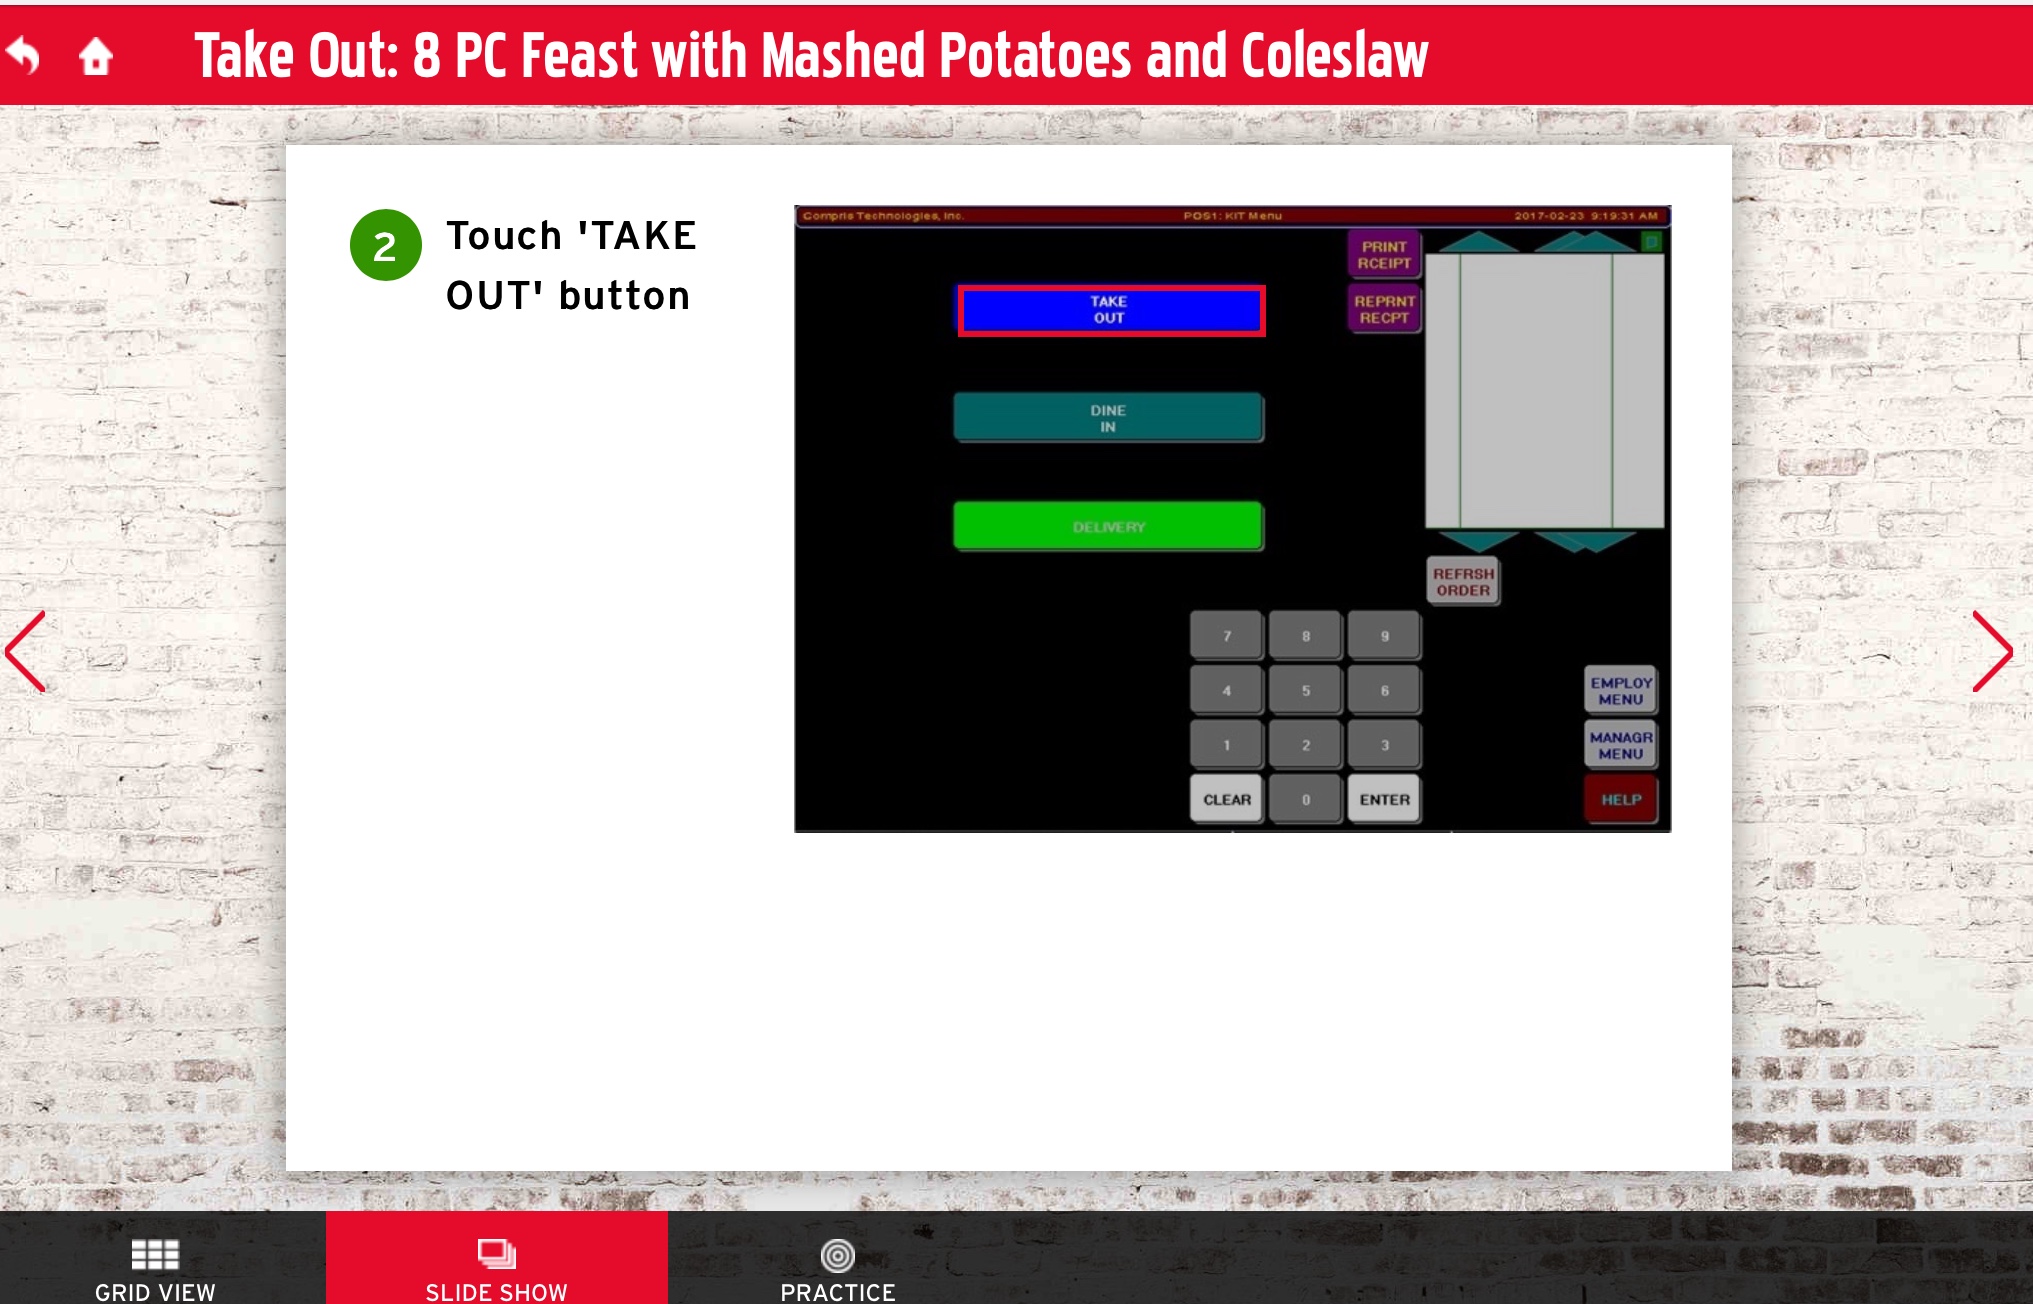
In the Hotspot card grid view, as with almost all the other Deckspert activity types, each step contains an image, a number, and a brief description of the proper action to take. The difference is that here, each accompanying image contains a red highlight box around the correct key to press at this point in the task. In Slideshow mode, the same information is displayed in a larger, one-card-per-screen format:
By far the most challenging aspect of creating a Hotspot activity is generating the screen captures you’ll need. If the system is running on a laptop or tablet, you can take advantage of the “print screen” capabilities that most modern operating systems have already built in. For instance, if it’s an iPad app, all you have to do is press the Home button and the Lock button simultaneously, and a capture of the entire screen will automatically be saved to Photos. If you have to manually take photos of the system screen, here are a few tips to make the process easier:
- Purchase a low-cost stand for your camera (or phone or tablet or whatever you’re using to take pictures). A cursory search on Amazon will yield dozens of options, from tripods to counter-top clamps with flexible arms. Try to select one that will provide maximum stability — the key is to keep the camera fixed so your framing will be consistent throughout the task.
- Use whatever is on hand to shade the monitor. Curtains, towels, tray pans, aprons can all serve to block glare in a pinch. Reflections on the screen will make the images hard to decipher.
- Adjust the camera position and zoom so that the screen fills the entire frame. Although including the boundaries of the monitor in your captures isn’t a disaster, you do want to maximize the amount of the detail in your final images. You also don’t want to have to do a lot of cropping in a photo editor after the fact if you’ve framed the images poorly.
- Take (a lot) more photos than you think are necessary. You’ll need to have one screen capture for every step, and it’s very easy to let a step go by without getting a usable shot of it.
- Before dismantling your camera set-up, review the photos on your device and mentally take note of which one goes with each step in the process. Better still, write out the steps in the task before you take any photos at all. That way, with an outline to guide you, you’ll be much less likely to miss something during the photo shoot session.
Once you’ve captured your screen shots and uploaded them to your Image Library (see Importing and Organizing Images), the process of creating a Hotspot deck is incredibly easy. You create each card in exactly the same way you would for a Procedure. Once you’ve added a step title and description (optional), you’ll just take the one extra step of drawing the hotspot itself.
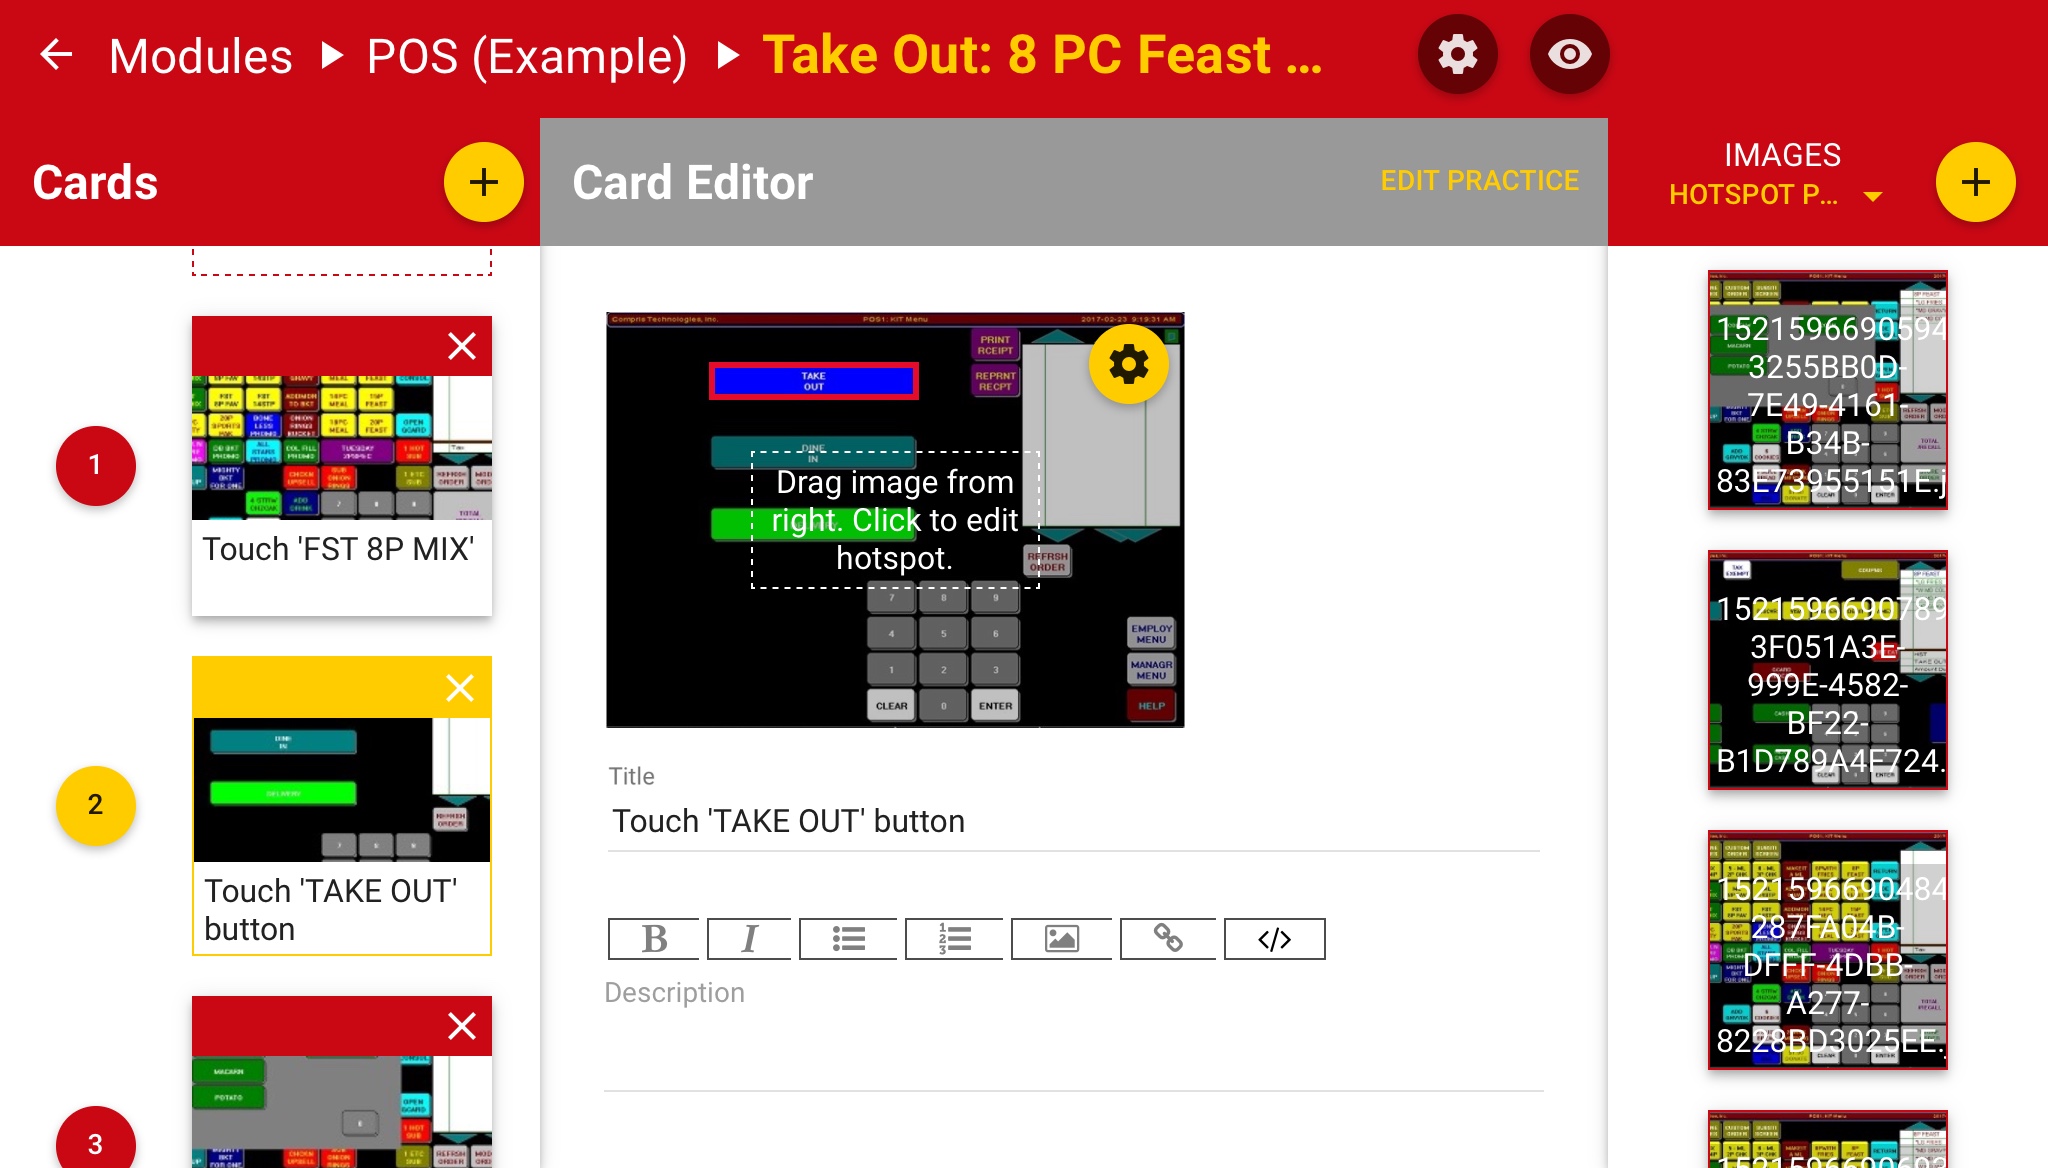
Click the Gear Icon in the upper right corner and select Edit Hotspot from the context menu. This will open up the Hotspot Editor shown below.
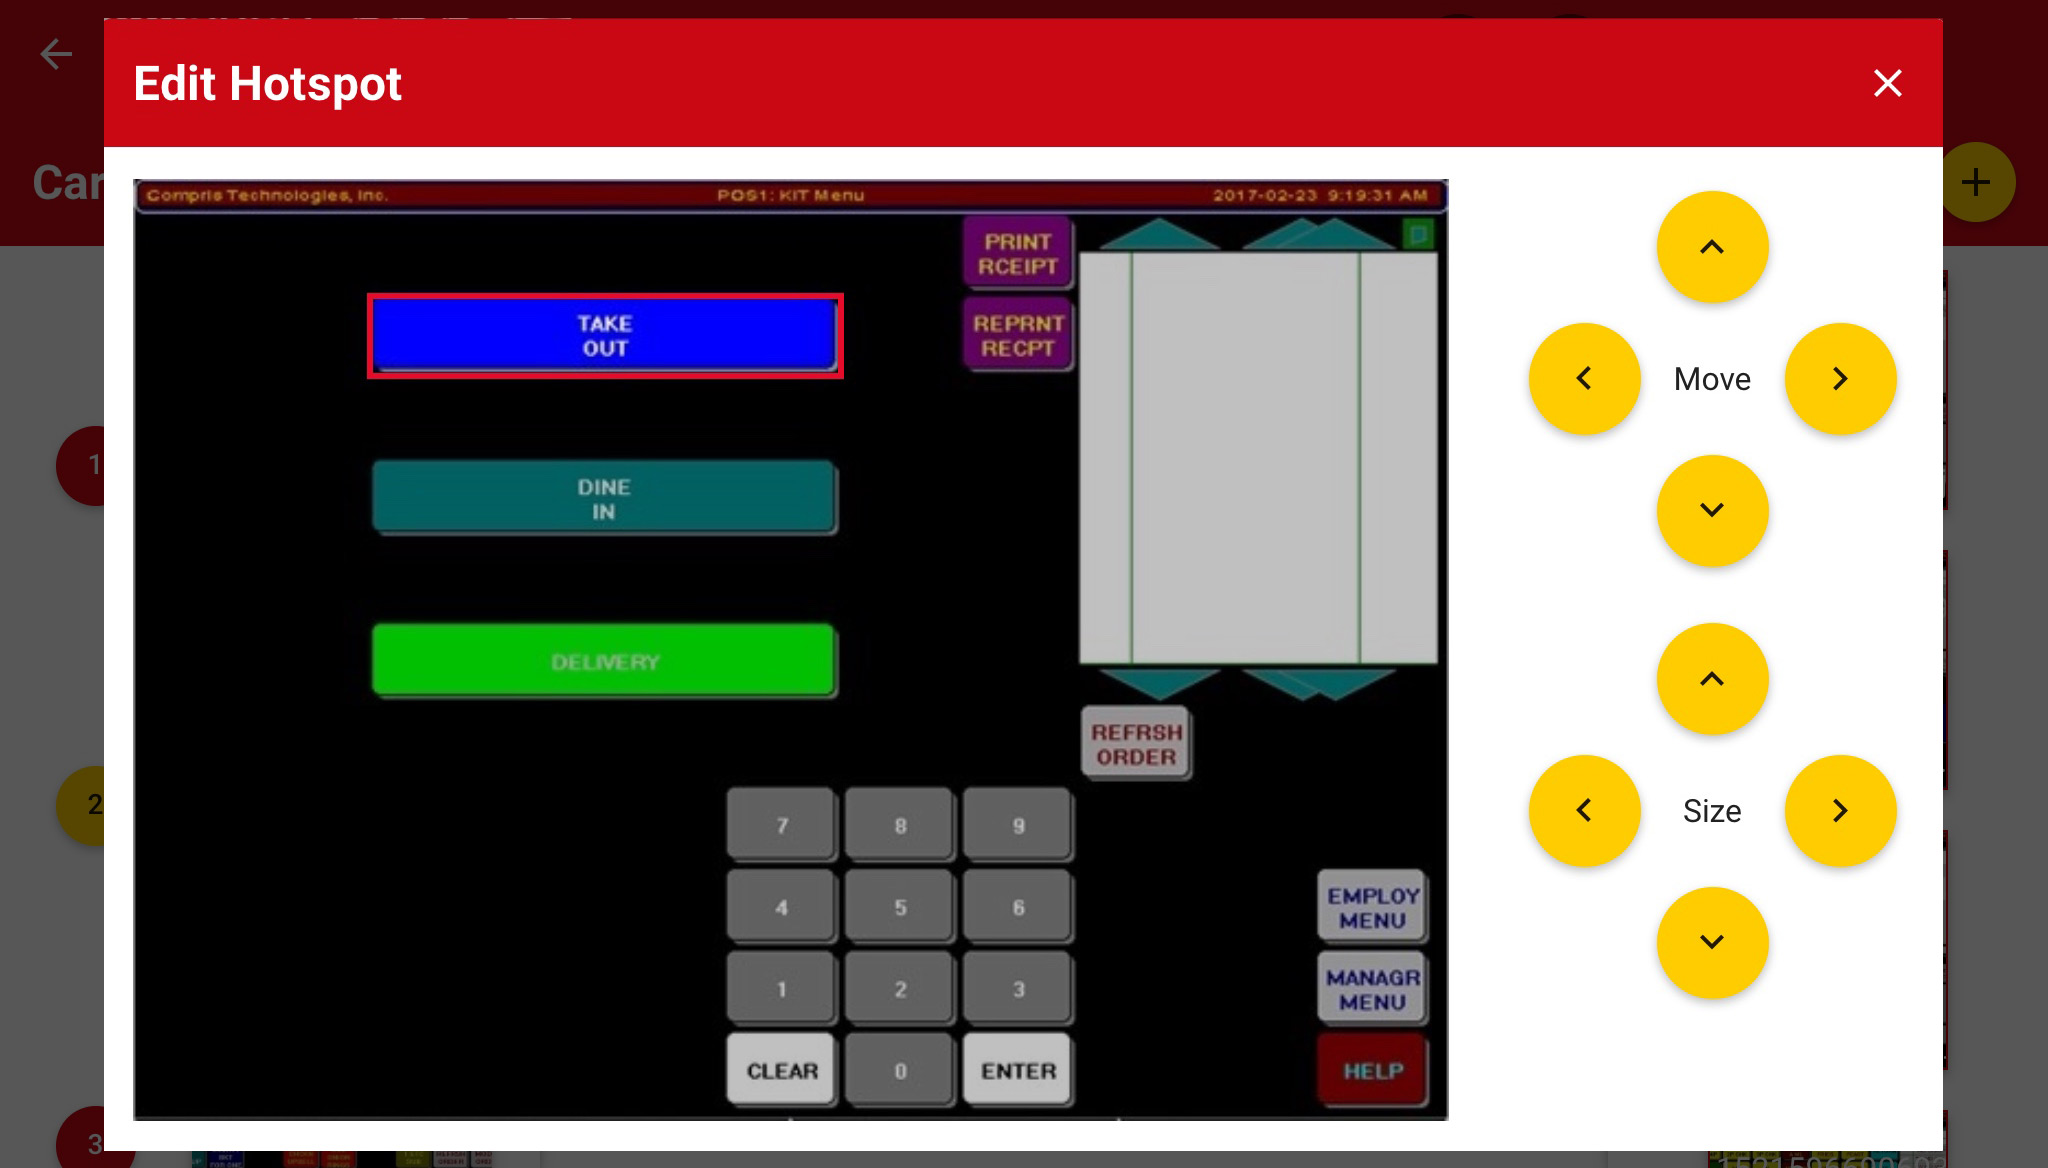
To draw a hotspot, click/touch and drag anywhere on the image, and you’ll see a red rectangle appear, which will expand and change dimensions as you move your mouse/finger. To create the hotspot you see above — the red rectangle over the blue Take Out key — you would start by pressing down on the upper left corner of the button, and then dragging down and to the right until the mouse pointer (or your finger) reaches the lower right corner of that area.
Once you have created a hotspot, you can move it around on the image by clicking inside it and dragging it. You can also make fine adjustments to the hotspot dimensions and position by using the key pads on the right. These are generally only needed if you’re authoring on a touch device, and you want finer-grained control over the size and positioning of the hotspot than your finger alone will allow.
When you’ve finished adding hotspots to all the images in the deck, you’ll find that you’ve not only completed the activity in Learn Mode, but you’ve finished creating the Practice, Challenge and Assessment modes as well!
Pro tip: While the Hotspot Activity type is ideally suited for software simulations, you can actually use it for any procedure that can be illustrated through a sequence of images.
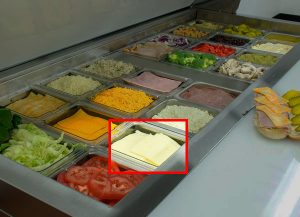
Imagine a Hotspot version of a sandwich-making activity. Instead of using separate close-up images for each step, the photos could depict the whole prep area, and the hotspots would highlight each ingredient in the process. In practice mode, the learner would click the next item to add in the bins instead of selecting from multiple thumbnail options. With a little ingenuity and creativity, the Hotspot activity can be used to create extremely context-specific training experiences, providing powerful preparation for live, shoulder-to-shoulder sessions.
Practice Mode: Hotspot Knowledge Check
The learner’s initial view of the Hotspot Practice mode should display exactly what they would see on the real system, along with a description of the task they need to perform.

As with the other activity types, the hint button will flash if they touch an incorrect area on the screen. When they click the Hint button, the correct key on the system (the hotspot) will be highlighted.

When the learner touches/clicks the correct area on the screen, the Practice advances to the next step in the task.
As the learner continues to go through the task, the correct steps are progressively displayed beneath the scenario description, as a consistent reminder of the proper steps.
Since the hotspots have already been created in Learn Mode, there is not much that remains to be done in Practice Mode for the editor. As you’ll see when you click “Edit Practice” from the Card Editor View, your only task is to enter the scenario text.
The last thing to be mindful of when creating a Hotspot activity is the limitations of the simulation. It cannot simulate text inputs, dragging items, or right-clicks; however, you can use the descriptive text in each card to indicate that the step involves an action beyond just a touch/click. For example, if the task is to drag an item from point A to point B, you might convey the action in two steps, positioning the first hotspot on the item to drag and the second on the destination. For a text input gesture, you can place the hotspot on the empty input field. When the learner clicks it, the screenshot for the next step would simply display the completed entry. If there is a numeric entry, like $40.00 in the example above, you might condense the inputs into a single step: place a single hotspot on the “4” on the keypad, and display the finished “40.00” in the subsequent one, thereby eliminating the need for the learner to touch each number separately. In general, using shortcuts like these will make the simulation flow better and more seamlessly for the learner.
Challenge Mode
The Challenge Mode of the Hotspot activity is no different from any other activity type. Essentially, it is timed “final exam” in which the learner must successfully complete the practice mode for all the decks in the module, at one or more levels of difficulty. For a more detailed discussion of how to configure the Challenge Mode, click here.
Assessment Mode: Optional
Since the Practice and Challenge modes of Hotspot provide such a close approximation of the task as it would be performed in the real world (on the simulated system), having an external observer perform an additional assessment would seem to be of limited value.
If the learner can successfully complete the advanced Challenge levels of a Hotspot module, this demonstration of mastery would seem adequate to merit completion of the training. However, the assessment mode may still be useful to verify that the trainee can complete the most critical tasks without mistakes in a real-world setting.
For instructions on how to customize the assessment mode see Configuring the Module.