Quick Links:
- Enabling/Disabling Modes
- Adding an Intro Deck
- Configuring Practice Mode
- Configuring Challenge Mode
- Configuring Assessment Mode
Enabling and Disabling Training Modes
When you click into a module and go into the Module View, you will see a series of tabs along the top of the screen. These tabs correspond to the module menu that the learner will see in the published version.
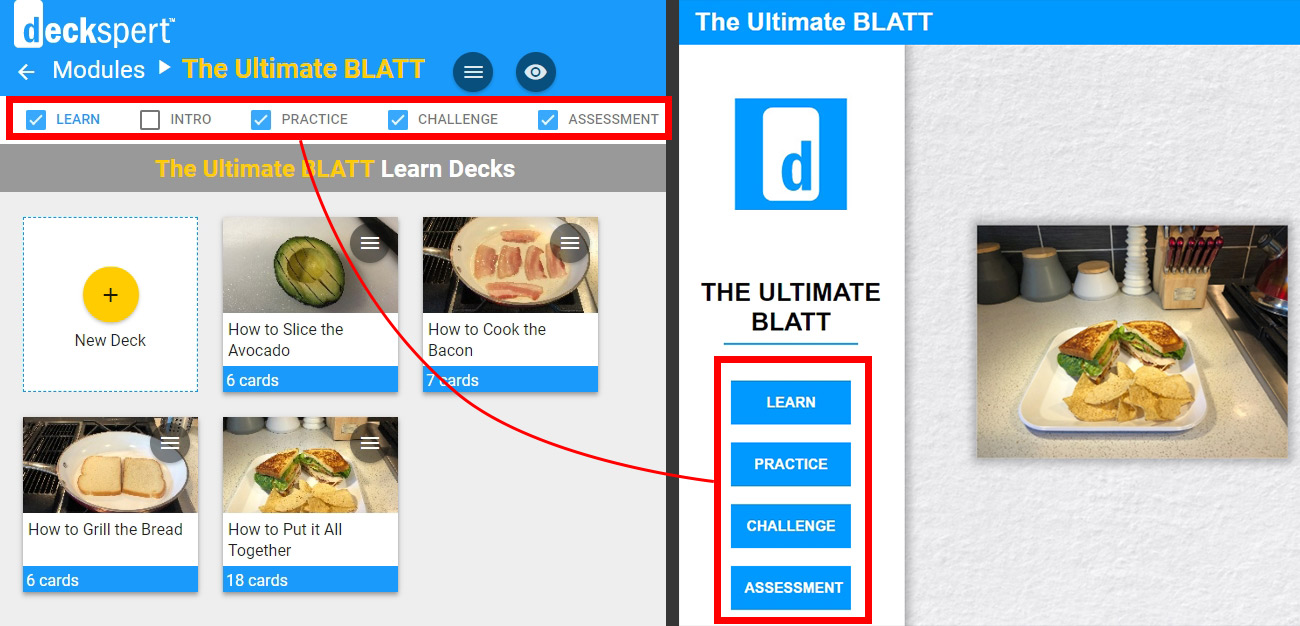
To enable or disable any of these sections, simply click the checkbox next to the tab label. Note, for example, that no Intro currently appears in the Learner view of the module; note also that the Intro checkbox in the editor view is unselected.
These checkboxes can be selected and deselected without impacting anything you have done in any of these sections. In other words, you can update the assessment settings, remove the assessment temporarily from the module by unchecking the corresponding box, and then re-enable it later without losing any of the changes you had previously made.
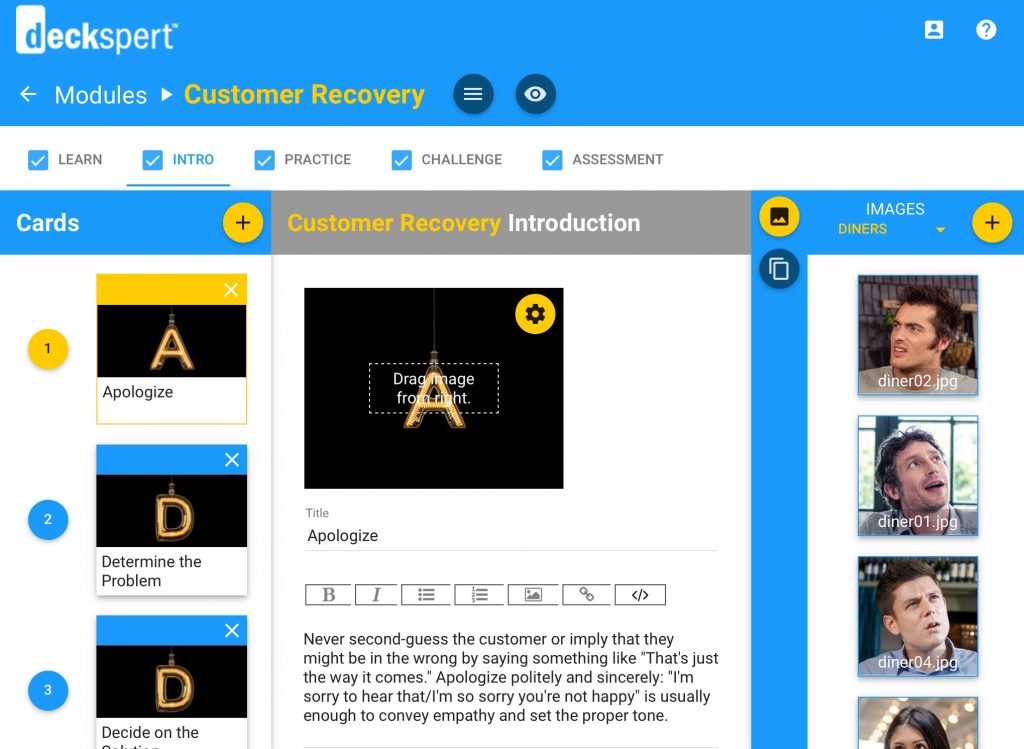
Adding an Intro Deck
For some modules, you may want to provide the learner a general introduction to or overview of the topic before getting into the actual training scenarios themselves. For example, in our Customer Recovery dialogue module, the Intro deck establishes what the recovery method is through a series of informational cards, and the module itself presents several customer interaction scenarios to demonstrate how that method is applied in specific situations.
To add an intro deck to the module, click the box next to the Intro tab to select it. Then click the Intro tab to display the intro card editor screen. From there, it is simply a matter of using the familiar card editor interface to create the deck itself.
Configuring Practice Mode
When you click on the Practice tab in the Module View, you will see a list of the module’s decks. You can configure the Practice questions for each deck by clicking them on this screen.
Since the practice mode for each activity type varies significantly, you should refer to the Activity Types section of the User Guide for details on how to configure the practice mode for each.
Configuring Challenge Mode
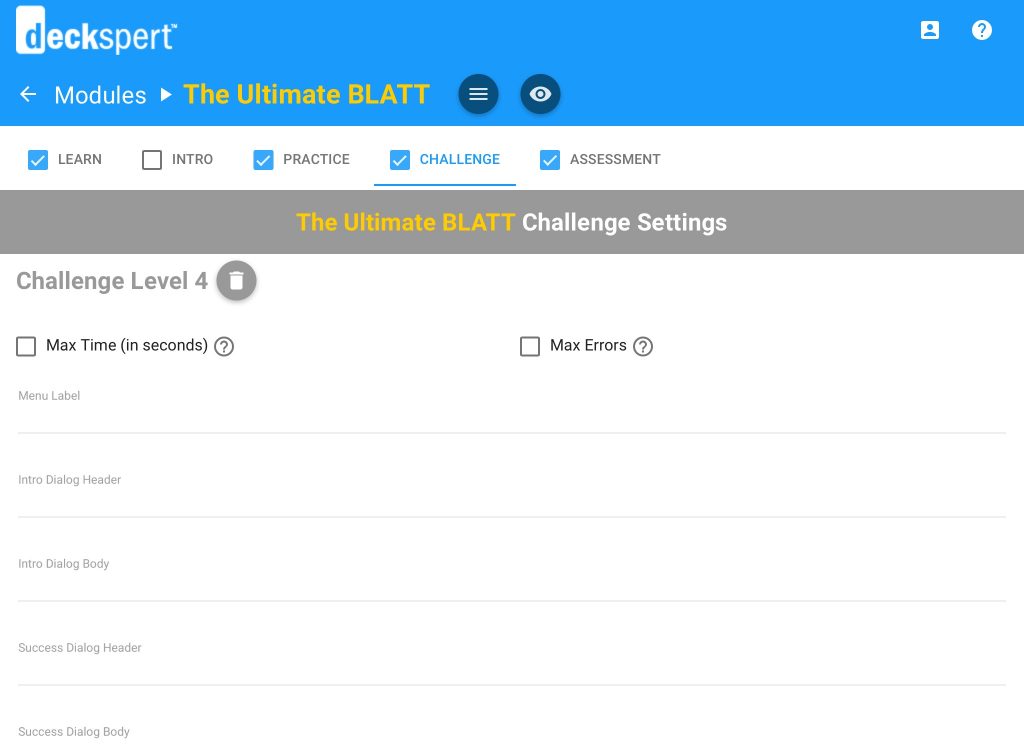
The Challenge Mode of the module is best thought of as the “final exam” which covers all the decks in that module. The Challenge runs through the Practice Mode of each deck in random order and requires the learner to demonstrate mastery of the content by completing every practice deck within a certain time limit and without making more than a set number of mistakes.
By default, the Challenge mode for every module has three levels: Novice, Apprentice, and Master. Each level has decreasing time limits and fewer allowable mistakes. Every level, however, is completely configurable in the Challenge Settings view.
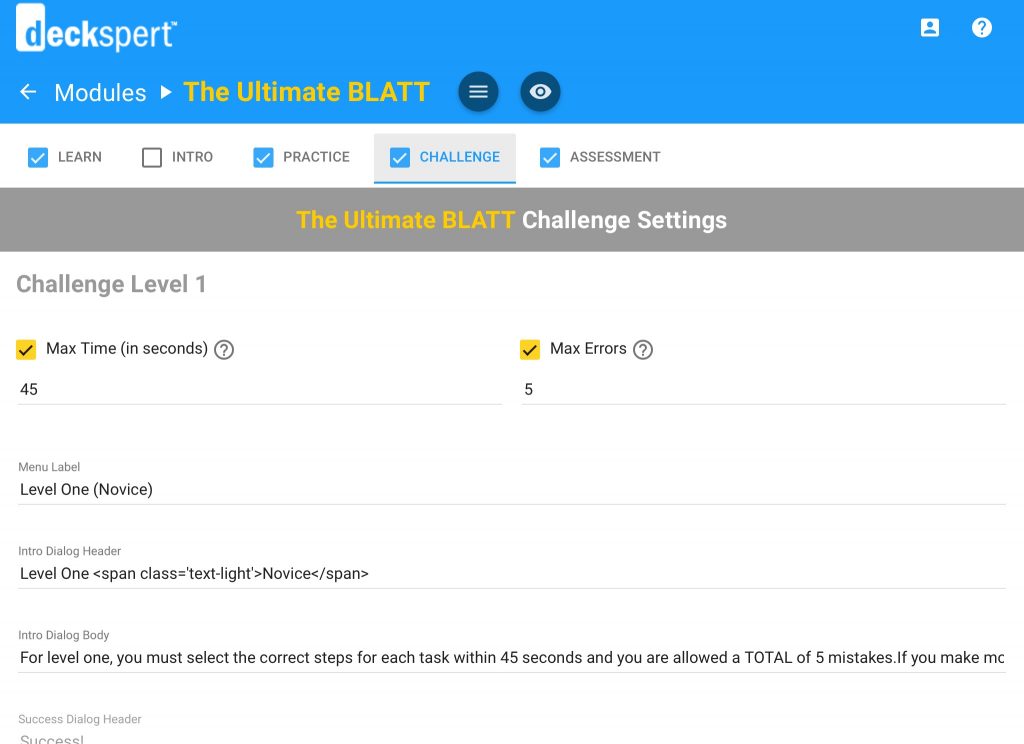
The Max Time setting at the top of the screen shot controls the amount of time the learner has to complete the deck practice. For a simple procedure, 45 seconds should be enough. If the procedure (or hotspot system simulation or dialogue) is more than a few steps, however, you should consider increasing the time to 60 or 90 seconds.
You can also disable the timer completely for any level by deselecting the box next to Max Time.
The “Max Errors” field controls how many mistakes are allowable in the Challenge as a whole before the learner fails and must retake the level. Again, depending on the number of decks in the module and their complexity, this number should be adjusted to maintain a difficulty level that is reasonable for the average learner. As the designer, you must decide what level of mastery is both desirable and practically achievable.
The rest of the fields in the Challenge Level settings contain the onscreen messages to the learner. Make sure to update these instructions when you change the time or error settings so the learner will not be confused or misled.
Adding/Deleting Challenge Levels
You can reduce the number of levels in the challenge by deleting the highest one (i.e. from the bottom up). For example, when you delete Level Three, shown below, you will then be able to delete Level Two.
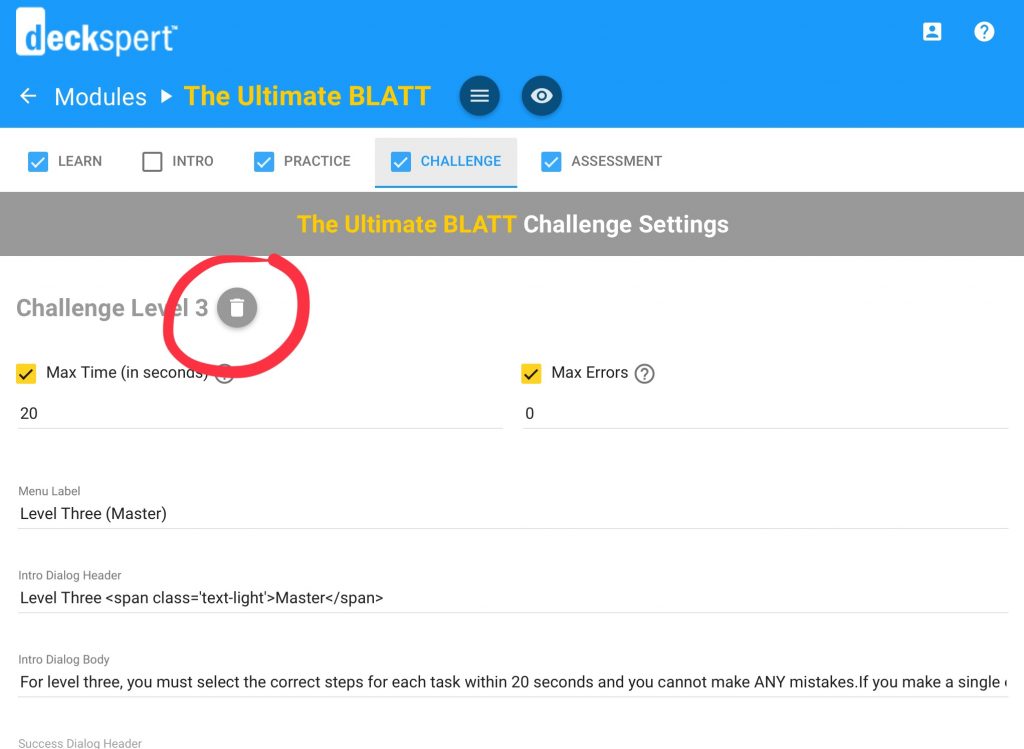
The challenge always must contain at least one level. If your intention is to disable the Challenge Mode entirely, you can do that by unchecking the box on the Challenge tab in the Module View (see Enabling and Disabling Training Modes above).
To add a Challenge Level, scroll down to the bottom of the screen, and you will see the Add button:

When you click the Add Challenge Level button, you will see the new level appear at the bottom of the list:
If the new level is higher than 3, you will need to fill in the message fields to describe the level and its requirements to the learner. Follow the example of the lower levels as you complete these fields. If the level is lower than 3 (for example, you have deleted and then re-added Level Three), you will see that the default messages will appear in these fields, as before.
Pro Tip: It is not recommended that you have more than three Challenge Levels. In fact, in most cases, two, or even just one will suffice. It all depends on the level of mastery you want to require from your trainees on this subject matter. If the challenge is used in combination with an assessment, it makes less sense to create a highly difficult challenge since the real goal is to have the trainee demonstrate the actual skills in the real world.
Whenever you add or delete a level, or edit an existing level’s settings, it very important to you review the message fields to make sure they accurately reflect the current Challenge Level settings. Otherwise, you will confuse your learners and possibly cause performance problems in their attempts to complete the module.
Configuring Assessment Mode
As we have said many times before in this User Guide, the Assessment Mode of a module (especially the Procedure type) is the most important element of the Deckspert training system. While the default settings for the assessment mode will be sufficient in most cases, adjusting them to suit the needs of the tasks being evaluated can greatly enhance the effectiveness of the coaching when mistakes are made.
The assessment uses the same deck and card content as Learn Mode. The only elements to configure for the Assessment Mode are the ratings that the evaluator can give to the trainee, and the reasons for the rating.
The Ratings Settings
In the below screenshot you can see how the ratings configuration in the Assessment Settings view will affect what the evaluator sees in the output:
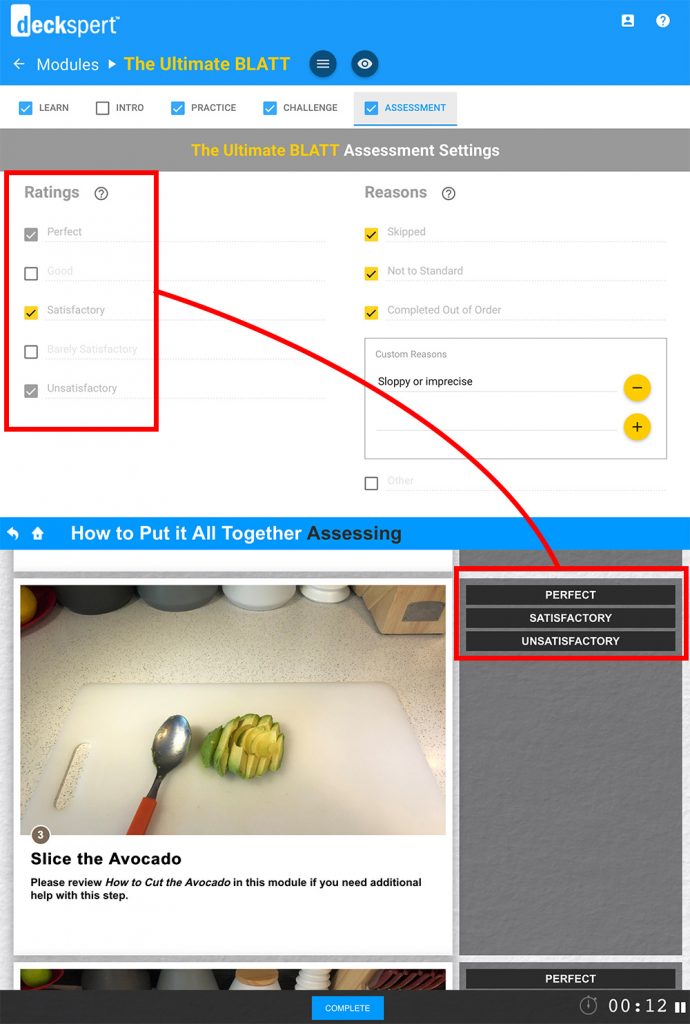
By default, Perfect and Unsatisfactory will always be enabled, and these two settings cannot be disabled since they correspond to the most basic pass/fail possibilities. You can add up to three other levels of evaluation, depending on the range of allowable error in executing a step that you want to afford to the trainee. In a Dialogue assessment, for example, there is much more room for ambiguity and nuance than in the sandwich-making procedure shown above. Therefore, affording a wider range of ratings options to the evaluator might make sense under certain circumstances.
NOTE: When you are configuring these ratings, it is very important to be aware that none of them will impact the overall pass/fail logic of the assessment as a whole. If the trainee receives anything above an unsatisfactory for all of the steps in the procedure, they will pass. The only way to “fail” the assessment is to receive an “unsatisfactory” rating on any one of the steps.
The recommended practice is to leave the ratings at their default setting. A simple binary makes the evaluation process easier for both the learner and the evaluator. If the “unsatisfactory” rating seems harsh, the “reasons” settings discussed next can offer a way to turn the negative impact of a failure into a valuable and empowering coaching opportunity.
The Reasons Settings
Whenever the evaluator select a rating lower than “Perfect,” the “reasons” checklist is displayed so that additional feedback can be captured on what exactly the trainee missed or did incorrectly. The screenshot below shows the Reasons settings in the Assessment view and the resulting view for the evaluator.
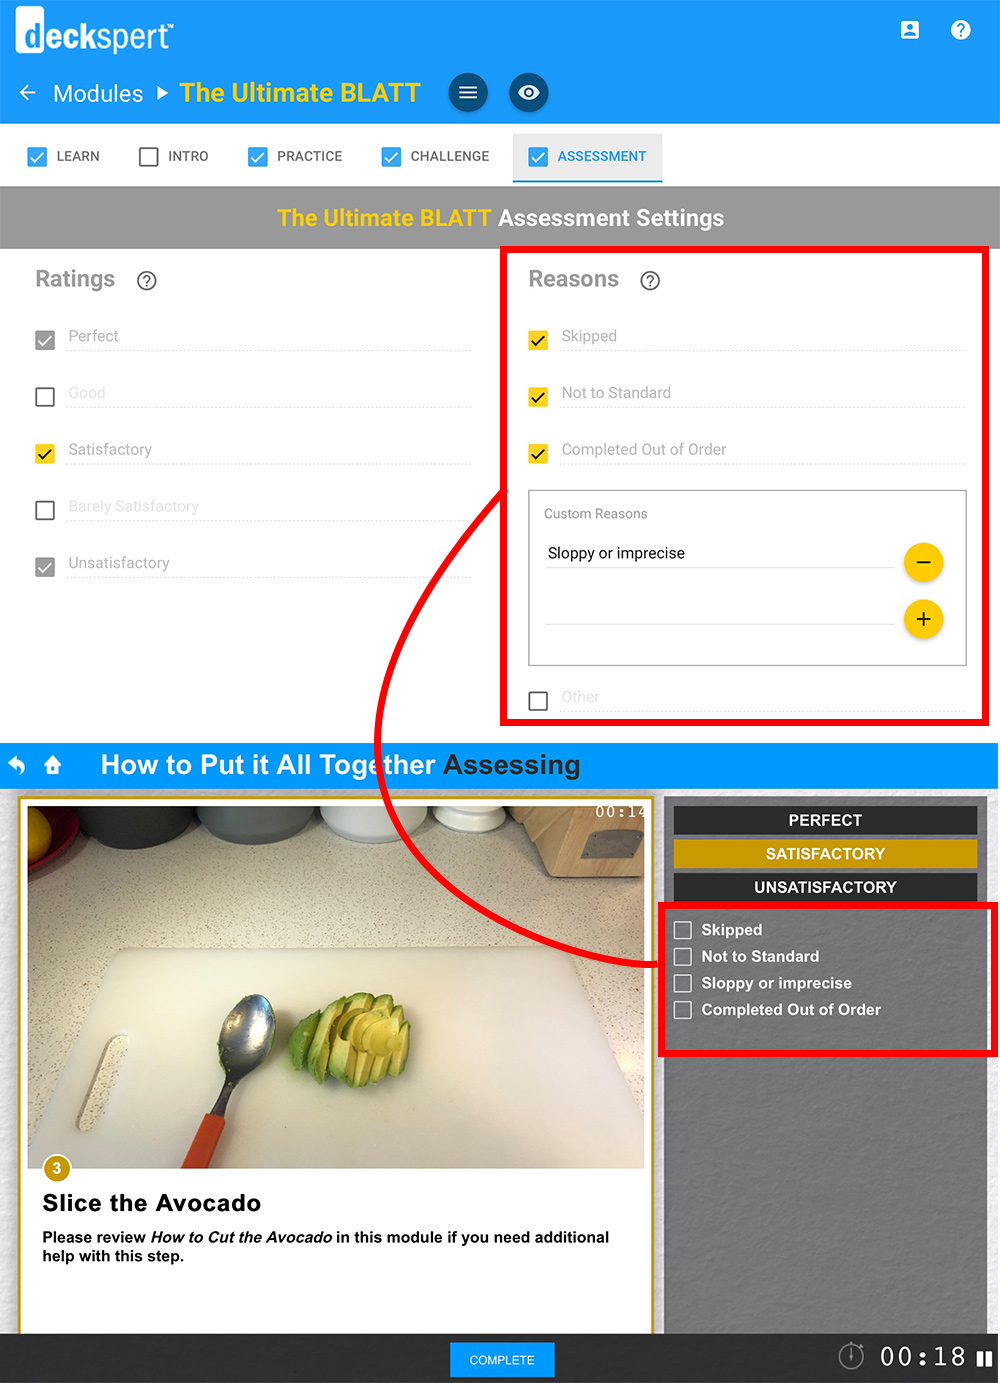
The default reasons are “Skipped,” “Not to Standard,” “Completed Out of Order” and “Other.” Each of these can be removed from the list by deselecting the checkbox next to it. You can also add custom reasons by entering them on the text line and clicking the plus button next to it. “Sloppy or imprecise,” in the above example, was added to this module to describe a mistake that might disqualify a trainee from a “Perfect” performance.
Once the assessment of this deck has been completed, the evaluator can share his screen (shown below) with the trainee.

As you can see, the disqualifying reasons for the less-than-perfect rating is displayed so that both the evaluator and the trainee can see and discuss exactly what went wrong. The “reasons” checklist should be used as a substitute for the kind of notes that an auditor or trainer might make when observing the kind of procedures or tasks covered in the module. Since the assessment itself proceeds too quickly for the evaluator to type written notes in the moment, try to use the reasons checklist to be as specific as possible in terms of listing common mistakes. Kind in mind, though, that this checklist will apply to every deck in the module, so keep it generic enough to apply across the variations among those decks.